How to Automatically Deploy from GitHub to Server using Webhook
What I was looking for was a solution to deploy code from GitHub involving no new accounts and a relatively low technical barrier to entry.

A way to get your code deployed to the production server
I’ve gotten into the habit of creating git repositories and managing them on GitHub. It’s a lot better than keeping everything on Google Drive or, even worse, on my hard drive. But the question always bugged me,
How do I get my code deployed to the production server?
Most of my searching led me to Jenkins and other continuous integration solutions, but I didn’t want that much overhead — after all, this isn’t my day job, so to speak. What I was looking for was a solution involving no new accounts, and a relatively low technical barrier to entry. Fortunately, in my search I came across the SaaS product HookDoo, which led me to Webhook—the server-residing, free-to-use, underlying technology of the former.
Webhook allows me to automatically retrieve the newest code any time a push is performed to the repo
For the purposes of this tutorial, we’ll be using a freshly created Digital Ocean droplet with Ubuntu 16.04 as our production server. To minimize the steps necessary to implement, I’ll be doing everything as the root user.
Start with GitHub
If you have an existing repo that you want to use then, great! You can take note of the SSH URI and you’re good to go. If you haven’t, create a new repository and copy down the SSH URI.

Installing Go and Webhook (Digital Ocean Droplet)
Before we dive in, let’s start by doing a quick update and upgrade since we have a fresh Ubuntu 16.04 installation.sudo apt update -y && sudo apt upgrade -y
After your upgrade is done we need to install the Go Programming Language, which is a prerequisite for installing Webhook. At the time of writing, the latest stable version is 1.11.4, so modify the version number as necessary.wget https://dl.google.com/go/go1.11.4.linux-amd64.tar.gz
sudo tar -C /usr/local -xzf go1.11.4.linux-amd64.tar.gz
export PATH=$PATH:/usr/local/go/bin
After this has been installed, download the latest version of Webhook.go get github.com/adnanh/webhook
There’s no progress bar, so don’t be alarmed. Once this is done, you can confirm by looking for the file ~/go/bin/webhook
Now that Webhook is installed, we need to create the directory structure and files for configuration, routing, and deployment script(s).mkdir ~/webhooks
mkdir ~/webhooks/deployment-tutorial
touch ~/webhooks/hooks.json
touch ~/webhooks/deployment-tutorial/deploy.sh
chmod +x ~/webhooks/deployment-tutorial/deploy.sh
The file hooks.json is going to hold our configuration and routing, while deploy.sh will be our bash script to execute the commands necessary to update from GitHub.
First, set up hooks.json by opening the file in your favorite command line text editor. This file is the configuration for endpoints that will be created when we run Webhook. The file is an array of objects where each object is a unique endpoint.[{
"id": "deployment-tutorial",
"execute-command": "/root/webhooks/deployment-tutorial/deploy.sh",
"command-working-directory": "/root/deployed-site/",
"response-message": "Executing deploy script...",
"trigger-rule": {
"match": {
"type": "payload-hash-sha1",
"secret": "The Returners",
"parameter": {
"source": "header",
"name": "X-Hub-Signature"
}
}
}
}]
- id: the unique name that will be used in the endpoint URL
- execute-command: the script to execute when the endpoint is invoked
- command-working-directory: the directory to be in when execute-command is run
- trigger-rule: an optional property that we’ll use to secure the endpoint via secret passphrase
A note about the values for execute-command and command-working-directory: Since I’m doing this as the root user the path begins with/rootbut if I was a logged in user it would be/home/usernamewhere you replace username. Do NOT use~/to start the path, it must be an absolute path or you will receive an error.
You’ll notice we set a working directory that does not exist yet. We’ll circle back to that, but first let’s finish up with deploy.sh
The bash script must always start with the shebang. You can confirm this by typing which bash prior to opening the file. Add the following commands to your script:#!/bin/bash
git fetch --all
git checkout --force "origin/master"
That’s it. We’ve installed Go and Webhook, set up the configuration in hooks.json and written our deployment script, which changes to the designated directory and pulls the master branch from our soon-to-be GitHub repo.
Finally, let’s fire up Webhook by typing the following after replacing 000.000.000.000with the actual IP address of your Droplet./root/go/bin/webhook -hooks /root/webhooks/hooks.json -ip "000.000.000.000" -verbose
You’ll notice that the output states serving hooks on… then prints a URL with {id} at the end. That would be the id from object we created in hooks.json file: deployment-tutorial.
Setting up Git (Digital Ocean Droplet)
We’re not done with our server quite yet. Open another terminal window and authenticate back into our server, since our first one window is running Webhook now. Remember that repository URI from the very beginning? We’re going to use it now.
Move to the working directory defined in hooks.json and type the following replacing your unique repo URI for mine after origin:git init
git remote add origin git@github.com:jhsu98/deployment-tutorial.git
Our final step on the server is to generate an SSH key-pair to be used when connecting to GitHub. In the Terminal window type ssh-keygen and confirm through the prompts by pressing ENTER until your keys are generated. Print out the public key by typing cat ~/.ssh/id_rsa.pub and copy the printed key which should look something like this:ssh-rsa AAAAB3NzaC1yc2EAAAADAQABAAABAQCyzJrPVOJqsTqD2R3xirTp3VNMwpmJMyLklzJg4sRQyslTUmbNNmDVO573EbXQQf2PqPQljqKDDlSaELdav4OTi1gPCoDary300yUqC/efLGHflZ6pMNuGsP2zTzerD/TMjzl1FXF1wOGTXqcC4TvGBS1bFyUY5n8wSOJ8ntZ6bBNv0zA2t7X1vH8ahIBJLKCayq9ipobKlHPYqxBt6zAoeh/ILQ0PWhGkmbGqqzqN1jcVWOefLgj4Dl8bZWORS1nkqrVg2wFC2nnibH97kZLsNrdQaeK8jUrkUWkJcUELI02mkkqh2RtBx9EwQEvsm9YuDBD9xF+HyuWoAeqcKerb root@github-webhook-tutorial
Now all that’s left is to configure our GitHub repo and test our deployment.
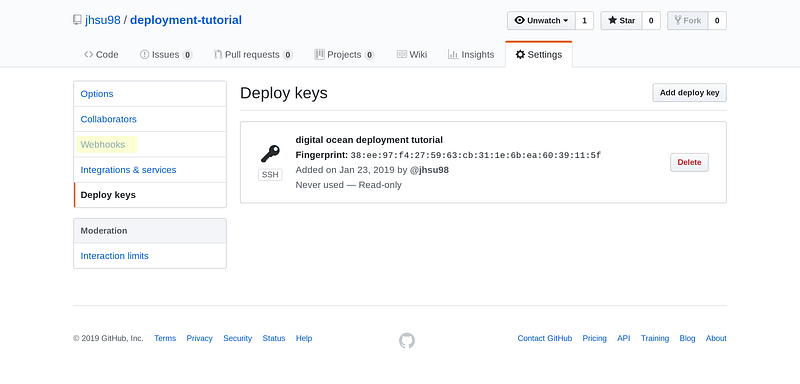
Configure Deployment Key and Webhooks (GitHub)
In your browser, go to the Settings for your repo by clicking on the gear icon. We’ll be setting up a Deployment Key first, so click there.

When you add the key, give it a name and paste in the printed key from above. GitHub only allows you to use a public key in one place, so if you have multiple sites to deploy to the same server, you’ll need multiple keys. Once the key has been made, go to the Webhooks section.
There are three fields to pay attention to: payload URL, content type, and secret. Payload URL is the endpoint being listened to by Webhook, content type is the format of the data, and secret is the custom string from your hooks.json configuration. The secret in this tutorial is The Returners

When you create the webhook you should see a check mark below the settings, meaning the server was successfully reached. Check your terminal running Webhook — you should see that the repo was fetched.
That’s it! To fully test the workflow, clone the repo to your local machine, if you haven’t already, and push a change to the master branch — you should see the change in your server as well.
Having built this a few times to practice, it now takes me about 10 minutes to set up — but that’s after hours of trial and error. Here’s a list of the things that hung me up the most:
- using the absolute path for the
hooks.jsonconfiguration values - not making
deploy.shan executable file - accepting the SSH connection the first time GitHub and the server interact
- using the wrong shebang in the bash script